I obtained these panels from a company called Sun Electronics out of Miami Florida at $0.78/watt, which is a very good deal. I payed about $1900 (with freight) for 10 panels at 2100 watts. I should have bought 10 more at least now that i think about it. The panels took several weeks to arrive but i was patient, especially at that price. These are Evergreen ESE 210W panels that are rated to work with Enphase Microinverter systems.
I met the freight driver in town (we live on a narrow dirt road) and loaded the pallet on a trailer, which weighed about 460 pounds. I was careful to inspect these panels as best i could before signing the shipping invoice. THIS IS IMPORTANT. Nonetheless, the panels were beautiful and i was excited to have them in my possession. They seem very well constructed and are impressively large in size.
I formulated a plan to mount these and asked a friend to assist on probably the coldest sunday of the year, but hey, i was anxious to get them on the mounts. Unfortunately he was running late so i got to work on my own.
I first installed the Enphase M215 microinverters which i found online for $150 a piece with free shipping. I bought 10 to match my number of panels. These are very nicely built with good efficiency ratings to boot and they have a 25 year warranty, which matches the warranty on the panels. So this system is built to last!
I installed the microinverters and all the bolts for the panels and jumper/bonding cables, which all came together very well. The ironridge system is very nice and easy to work with.
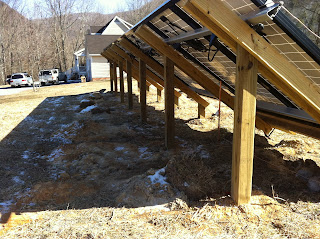
I heeded Gary's advice and made a board system for the bottom of the mounts to hold the panels while i carefully lined them up.
http://www.builditsolar.com/Projects/PV/EnphasePV/ComponentInstall.htm
Once i felt strongly the first panel was squared up and in place i began adding panels.
The panels went on very quickly and and suprisingly easy once the first one was set up really well. I did this alone in about 2 hours at most. It was fun and painless. The panels weight about 45 pounds each. I torqued all the bolts to specification, using the WEEB grounding washer system. I used a copper strand through all the microinverters and tied these to two grounding rods spaced 6 feet apart (inspector requested two rods).
I cut the rods off at the ground after pounding them in as far as i possibly could (about 7 feet each).
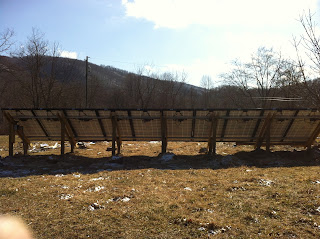
looking 180 degrees south.
Here is a picture from my back deck, with the drain back solar hot water heating system in the foreground to the right. The trencher helped with the 100 or so feet i had to dig to bring the 1.5 inch conduit to the house. It is 18 inches deep in conduit (per code). I think they look pretty nice out in the field.


You were getting a lot of compliments on this install when we wrapped up the solar thermal at my house on Saturday.
ReplyDeleteI want say that this article is very nice and very informative article.I will make sure to be reading your blog more.
ReplyDeleteSolar Panel Roof Tiles
Solar Pool Heating
Solar Las Vegas
Solar Power Installation Companies
Hello everyone on here my name is Fumo Sadiku living in Malindi City Kenyan I want to tell a little more about a good hearten man called Benjamin Breil Lee working with Le_meridian funding service as loan officer, Mr Benjamin Breil Lee helped me get a loan of 37,115,225.00 Shillings on my trying time trying to get back on my feet to raise my business I know there are some of you here who are in financial difficulties to talk to Mr Benjamin on what's app 1-989-394-3740 Or email his company E-Mail lfdsloans@lemeridianfds.com also with his personal E-mail on lfdsloans@outlook.com I'm so glad for what he did for me and for his Bank accountant as well Accountant Hernandez Lucas Thank you very much for your work well done.
ReplyDelete